Did you just update your old article or a URL? Then you should be sending site visitors in the right direction. Well, you can do that! But do you have a fear of losing visitors, right? (Don't worry)

|
In this article, I will help you set up custom redirects in Blogger along with screenshots so that you do it correctly. We will also explore what custom redirects are in Blogger, the benefits of custom redirects, and the step-by-step implementation process and how to redirect a url in blogger. So stay active until the end because if you do it incorrectly, you'll lose your traffic.
What are Custom Redirects in Blogger?
Custom Redirects are useful for maintaining correct navigation when dealing with broken links. It simply means redirecting the old URL to the new one. Without proper navigation, your visitors might not land on the correct page.
Setting up custom redirects provides you with numerous benefits; let's check them out:
Benefits of Redirecting URL in Blogger
Let me share with you the benefits of custom redirects, including fixing 301 and 404 errors, along with other key advantages.
- It helps boost SEO: Search engines love proper navigation. By using custom redirects, you inform search bots where your content has moved, automatically improving your SEO ranking.
- It creates a smooth User Experience: Imagine your reader clicking on an old link and ending up on an error page. Frustrating, right? Redirects keep your visitors happy, as they help reach the correct page.
- It ensures proper Link Management: If you're updating your blog structure or rebranding it, redirects help you manage old links, thereby fixing broken links and automatically maintaining good SEO links.
How to Setup Custom Redirects in Blogger [with Step-by-Step]
Setting up custom redirects in Blogger is super easy, as I've listed a step-by-step process along with screenshots. Please follow it carefully to avoid any errors.
Step 1: Log in to Your Blogger Account
Navigate to your Blogger dashboard and log in to your account.
Step 2: Select Your Blog
If you have multiple blogs, choose the one where you want to set up custom redirects.
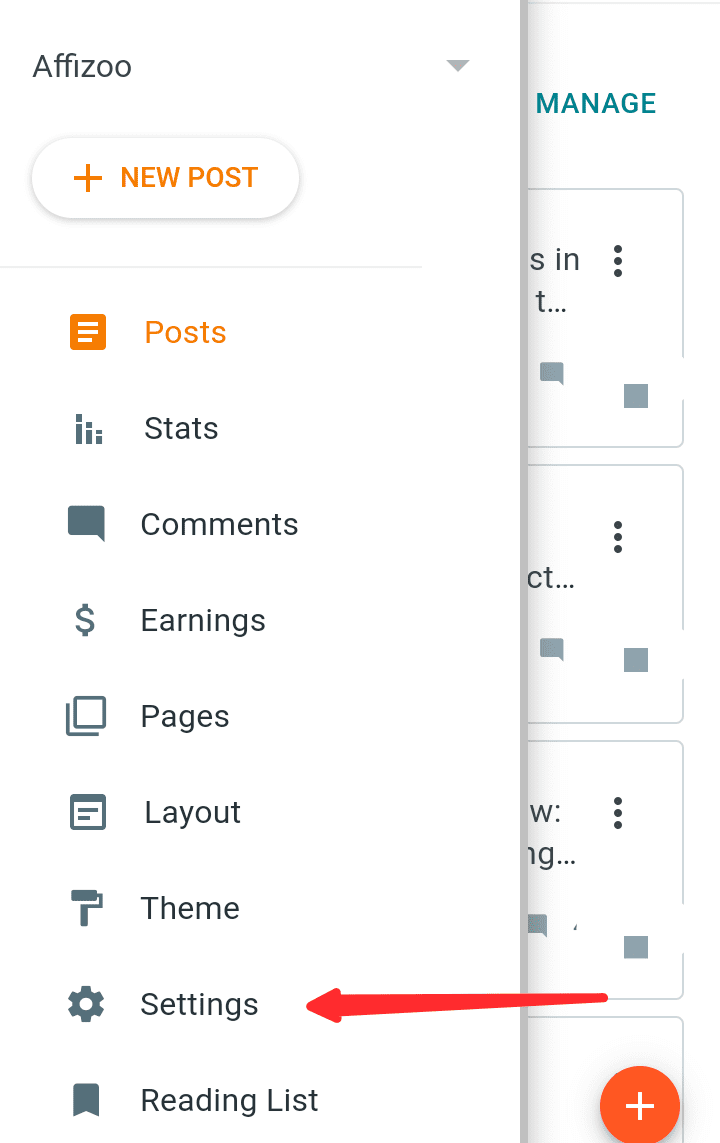
Step 3: Go to Settings
In the left-hand menu, find and click on "Settings" tab.
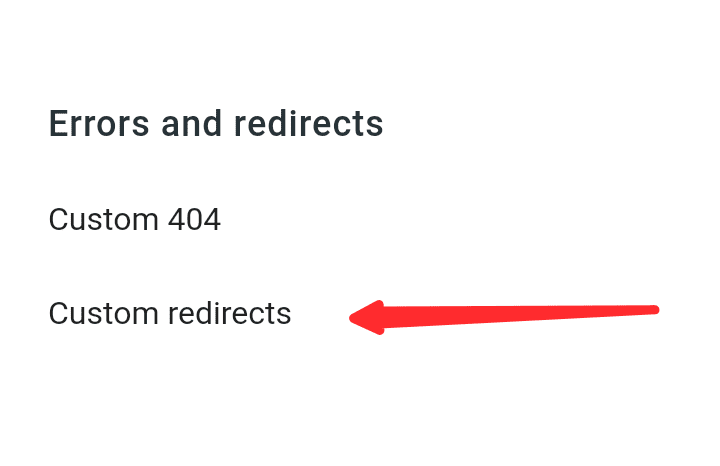
Step 4: Set up Custom Redirects
Scroll down until you find the "Errors and Redirects" section. Look for the "Custom Redirects" option and click on it.
Step 5: Add New Redirect
Now, you'll see a popup where you can add your custom redirects. Click on "Add".

Step 6: Input Old and New URLs
In the "From" field, enter the old URL you want to redirect. In the "To" field, input the new URL or the page where you want the old URL to lead.

Step 7: Save Changes
Click "Save" to apply your custom redirect. Repeat these steps for any additional redirects you need.

Congratulations! You've successfully set up custom redirects in Blogger.
Conclusion
Overall, setting up custom redirects in Blogger helps you manage broken links, boosting SEO and improves site navigation, thereby creating a smoother user experience and increasing organic traffic.
So, if you haven't added custom redirects to your Blogspot blog or are facing any issues regarding it, feel free to share your query in the comments section.